Trial of the Sekhemas

The Trial of the Sekhemas is one of three Ascension Trials, first accessible in Act 2. It is a randomized gauntlet of rooms filled with monsters, traps, and bosses that can damage and reduce a player's Honour, ending the run when empty. Players are affected by Boons and Afflictions affecting the run's difficulty and can interact with a variety of mechanics to recover their honour, improve, or change their odds. The trial is based on the Forbidden Sanctum from Path of Exile 1.
Access
To gain access, the player must visit the Trial of the Sekhemas waypoint in Act 2 of the campaign and insert a ![]() Djinn BaryaDjinn BaryaArea Level: #
Djinn BaryaDjinn BaryaArea Level: #
Number of Trials: #"Take me to the Trial of the Sekhemas.
I will serve."Take this item to the Relic Altar at the Trial of the Sekhemas.![]() into the Relic Altar. Each trial run is independent between characters on the same account.
into the Relic Altar. Each trial run is independent between characters on the same account.
During the campaign, the player can acquire the ![]() Balbala's BaryaBalbala's BaryaArea Level: 22
Balbala's BaryaBalbala's BaryaArea Level: 22
Number of Trials: 1"Why are you standing there gawking at me?
We must go to the Trial of the Sekhemas!"Take this item to the Trial of the Sekhemas. Right-click to listen to Balbala.![]() quest item by defeating Balbala, the Traitor in Traitor's Passage of Act 2. The item works similarly to a regular
quest item by defeating Balbala, the Traitor in Traitor's Passage of Act 2. The item works similarly to a regular ![]() Djinn BaryaDjinn BaryaArea Level: #
Djinn BaryaDjinn BaryaArea Level: #
Number of Trials: #"Take me to the Trial of the Sekhemas.
I will serve."Take this item to the Relic Altar at the Trial of the Sekhemas.![]() , but it is returned to the player if the challenge is failed.
, but it is returned to the player if the challenge is failed.
Every Trial of the Sekhema's run has a number of challenges spread across 4 floors with 8 rooms each for a total of 32 rooms. The item level of the ![]() Djinn BaryaDjinn BaryaArea Level: #
Djinn BaryaDjinn BaryaArea Level: #
Number of Trials: #"Take me to the Trial of the Sekhemas.
I will serve."Take this item to the Relic Altar at the Trial of the Sekhemas.![]() will dictate the number of floors available in the run and whether or not completing them will award the player additional ascendancy points. Higher level keys provide improved rewards and are tradeable.
will dictate the number of floors available in the run and whether or not completing them will award the player additional ascendancy points. Higher level keys provide improved rewards and are tradeable.
| Floor 1 | Floor 2 | Floor 3 | Floor 4 | |
|---|---|---|---|---|
| Trial Key | Number of Trials: 1"Why are you standing there gawking at me? We must go to the Trial of the Sekhemas!"Take this item to the Trial of the Sekhemas. Right-click to listen to Balbala. Number of Trials: #"Take me to the Trial of the Sekhemas. I will serve."Take this item to the Relic Altar at the Trial of the Sekhemas. Area Level 20+ |
Number of Trials: #"Take me to the Trial of the Sekhemas. I will serve."Take this item to the Relic Altar at the Trial of the Sekhemas. Area Level 45+ |
Number of Trials: #"Take me to the Trial of the Sekhemas. I will serve."Take this item to the Relic Altar at the Trial of the Sekhemas. Area Level 60+ |
Number of Trials: #"Take me to the Trial of the Sekhemas. I will serve."Take this item to the Relic Altar at the Trial of the Sekhemas. Area Level 75+ |
| Bosses | Rattlecage, the Earthbreaker | Hadi of the Flaming River and Rafiq of the Frozen Spring |
Ashar, the Sand Mother | Zarokh, the Temporal |
| Ascendancy Points | 2 | 4 | 6 | 8 |
Mousing over the key will reveal both the area level and number of trials (floors) the run will yield. It will also indicate whether or not the run may grant additional ascendancy skill points upon completion. Consult the Ascension Trials page for more information.
Setup
Upon inserting the ![]() Djinn BaryaDjinn BaryaArea Level: #
Djinn BaryaDjinn BaryaArea Level: #
Number of Trials: #"Take me to the Trial of the Sekhemas.
I will serve."Take this item to the Relic Altar at the Trial of the Sekhemas.![]() in the Relic Altar, players will be able to place relics within, items that provide beneficial modifiers that affect your run. Once a trial has started, it must be completed, failed, or forfeited to add or remove relics. Relics can be also stored at the Relic Locker which is shared between all your characters in the same league.
in the Relic Altar, players will be able to place relics within, items that provide beneficial modifiers that affect your run. Once a trial has started, it must be completed, failed, or forfeited to add or remove relics. Relics can be also stored at the Relic Locker which is shared between all your characters in the same league.
-
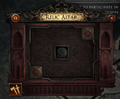
Empty Relic Altar before putting in a coin
-
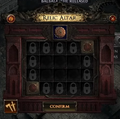
The Relic Altar in its initial state
-
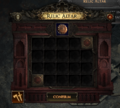
Fully unlocked Relic Altar


The Relic Altar has 18 inventory spaces, 12 of which need to be unlocked by defeating floor bosses and opening key caches within the trial. The ![]() Djinn BaryaDjinn BaryaArea Level: #
Djinn BaryaDjinn BaryaArea Level: #
Number of Trials: #"Take me to the Trial of the Sekhemas.
I will serve."Take this item to the Relic Altar at the Trial of the Sekhemas.![]() will not be consumed until the relics are confirmed. Floor completion required to unlock squares is depicted below:
will not be consumed until the relics are confirmed. Floor completion required to unlock squares is depicted below:
| 3 | 1 | 1 | 2 | X |
| 2 | 3 | |||
| 3 | 4 | |||
| X | 4 | 1 | 2 | 4 |
Unlocking the Ritual Altar for the first time will reward the player with a magic rarity ![]() Urn RelicUrn RelicPlace this item on the Relic Altar at the start of the Trial of the Sekhemas
Urn RelicUrn RelicPlace this item on the Relic Altar at the start of the Trial of the Sekhemas![]() . These non-unique relics can have up to 2 modifiers and can be modified with a
. These non-unique relics can have up to 2 modifiers and can be modified with a ![]() Orb of AugmentationOrb of AugmentationStack Size: 30Augments a Magic item with a new random modifierRight click this item then left click a magic item to apply it. Magic items can have up to two random modifiers.
Orb of AugmentationOrb of AugmentationStack Size: 30Augments a Magic item with a new random modifierRight click this item then left click a magic item to apply it. Magic items can have up to two random modifiers.![]() . The pool of modifiers relics can roll depends on the total number of inventory slots it takes up, ranging from 2/3/4 or small/medium/large respectively.
. The pool of modifiers relics can roll depends on the total number of inventory slots it takes up, ranging from 2/3/4 or small/medium/large respectively.

All of your progress, including Honour, Sacred Water, Boons, Keys, and Afflictions are carried over between rooms and floors unless otherwise stated. If a player's client crashes during a trial, it will reset the room's progress as long as the player did not fail the room due to honour loss. However, any changes to the player's honour that happened in the room will be retained. Sacred Water and rewards are locked in upon successful completion of a room. It is possible to return back into a completed room from the reward room to kill any remaining enemies or open chests. Opening the door to the next floor in the reward room will prevent you from interacting with the merchant in that room any further.
Upon successfully completing a room, a door will lead to a safe area to collect the room's rewards. Players must select the next room by interacting with the trial map which will show a preview of room connections of the current floor. While by default, players are able to see 1 room ahead of their current position in the map, this number can be increased or reduced by boons and afflictions. Each room that is visible shows their their objective (name), reward (icon), and whether or not an affliction is inflicted on the player upon entry.
Room Objective Types
Each trial room contains one of the following objectives which must be completed to move forward:
| Trial | Objective | Description |
|---|---|---|
| Chalice | Defeat the rare monsters | Activate the chalice and defeat all rare monsters in the room. Clearing 50% of the rare monsters will cause an indicator to appear, pointing toward those remaining. |
| Escape | Disable the crystals | Disable all the death crystals in the room before the timer expires. Activating crystals will lengthen the timer and indicate the direction of the next crystal. |
| Ritual | Defeat the ritual casters | Defeat ritual casters to close the portals spawning reinforcements. |
| Gauntlet | Find the exit | Navigate the trap circuit, activating coloured levers to unlock the path forward. |
| Hourglass | Survive | Survive continuously spawning monsters until the timer expires. Killing rare monsters reduces the timer. |
| Boss | Defeat the floor boss | Kill the floor guardian to advance. |
Room Reward Types
Each trial room contains one of the following rewards:
| Reward | Description |
|---|---|
| Merchant | Merchant rooms contain the NPC Balbala, the Released who sells you Boons or relics or restores your Honour in exchange for Sacred Water. Boons cost have individual prices, while relics cost 300, 400, or 500 Sacred Water based on their size. Balbala is also guaranteed to appear at the end of each floor in the reward cache room after defeating a floor boss. |
| Sacred Water Fountain | A fountain containing an amount of Sacred Water, a non-tradeable currency used within the trial. |
| Marakesh Shrine | Spend 5 Sacred Water to venerate a shrine and restore your Honour.
|
| Pledge | Spend 5 Sacred Water to select one of three random Pledges. |
| Cache | A bonus cache of the specified type will be located in the room which can be opened by using any acquired keys. |
| Key | Awards the player with a |
Bosses
| Boss Name | Boss Room | Floor name | Description |
|---|---|---|---|
| Rattlecage, the Earthbreaker | Collapsing Cavern | Test of Strength | Four-legged golem that uses fiery slam attacks. |
| Hadi of the Flaming River Rafiq of the Frozen Spring |
Ceremonial Chamber | Test of Will | Two large melee sentinels that use fire and ice melee attacks. |
| Ashar, the Sand Mother | Sand Pit | Test of Cunning | A large scorpion that burrows and inflicts poison attacks. |
| Zarokh, the Temporal | Outside of Time | Test of Time | A floating chronomancer with several gimmicks related to action speed and time. Cannot pause the game against this boss. |
Mechanics
Sacred Water
Sacred water is a type of non-tradeable currency used to trade with the Merchant to recover Honour, purchase Boons and relics, to venerate Marakesh Shrines to recover Honour, or it converted into Keys at the Keth Forge in the cache reward room after a floor boss. Fountains can be either regular or large. Sacred Water also can be found from chests or slain rare enemies and bosses. It appears as light blue droplets of water and is collected automatically when the player is near it.
Honour
Honour is a resource players have while participating in the Trial of the Sekhemas.
Honour pool:
- A player's honour is based on the sum of the player's default maximum life and energy shield when starting the trial. If a character has the Mind over Matter keystone active, maximum mana will be added to this total as well.
- Honour can be further increased or reduced by modifiers from relics, Boons, and Afflictions. It can be recovered by trading with the Merchant or venerating certain Marakesh Shrines.
Honour loss:
- Players lose honour by suffering hits from monsters or traps in the Trial. Minions and non-party allies do not cause Honour to be lost if hit. Closer proximity to monsters reduces the Honour lost on hit, up to 35% less in close range.
- Damage to honour is mitigated by Honour Resistance, an important stat players should invest into through relic modifiers that can reduce honour loss up to a maximum of 75%.
- Honour is maintained between rooms, and the player automatically fails the trial when Honour is reduced to 0. Failing a trial does not count as a death, nor does it affect a character's experience.
Other interactions:
- If a player levels up within the Trial, causing the player to gain additional life, an equivalent amount of Honour and maximum Honour will also be increased.[1]
- Gaining maximum honour through boons will also cause the character to gain current Honour of the same amount. Losing Maximum Honour will not further affect the current Honour.
Boons
Boons grant various benefits to your Trial run and can help recover or mitigate damage to your Honour, increase your Sacred Water and rewards, debuff monsters, and more:
| Boon Type | Image | Boon Name | Description | Merchant cost |
|---|---|---|---|---|
| Major Boon |  |
Ahkeli's Guard | You cannot be Damaged for 1 second after taking Damage from an Enemy Hit | |
| Major Boon |  |
All-Seeing Eye | The Trial Map is fully revealed Note: This overrides the Black, Golden, and Red Smoke afflictions. |
300-600 |
| Major Boon |  |
Crystal Shard | The next Affliction you gain is converted into a random Minor Boon | |
| Major Boon |  |
Dekhara's Necklace | You cannot receive any more Minor Afflictions | |
| Major Boon |  |
Earned Honour | Restore # of your Honour on room completion Note: This also restores all Life and Mana on room completion. |
600 |
| Major Boon |  |
Garukhan's Favour | Ignore the first Damage taken from an Enemy Hit in each Room (note: this stacks between rooms) | |
| Major Boon |  |
Holy Water | Gain a random Minor Boon when you venerate a Maraketh Shrine | |
| Major Boon |  |
Imperial Seal | Traps are Disabled | 600 |
| Major Boon |  |
Orbala's Leathers | Upon reaching 0 Honour, revive once with 50% less Honour | |
| Major Boon |  |
Raincaller | Sacred Water found is doubled | |
| Major Boon |  |
Reparations | Gain 2 Sacred Water when you take Damage from an Enemy Hit | |
| Major Boon |  |
Sekhema's Cloak | Upon reaching 0 Life, revive once with Full Honour | |
| Minor Boon |  |
Adrenaline Vial | Restore 30% of your Honour on entering a Boss Room | 220-320 |
| Minor Boon |  |
Assassin's Blade | The next 10 non-Boss Monsters you Hit are killed instantly | 220-420 |
| Minor Boon |  |
Balbala's Gift | Your next purchase from the Merchant has no cost | 280-320 |
| Minor Boon |  |
Black Pearl | Traps deal 50% less damage | 280 - 320 |
| Minor Boon |  |
Diverted River | Sacred Water found on this floor is doubled | 220-360 |
| Minor Boon |  |
Enchanted Urn | 30% increased Effect of your Non-Unique Relics | 220 |
| Minor Boon |  |
Flooding Rivers | 50% more Sacred Water found | 220-420 |
| Minor Boon |  |
Fountain of Youth | Restore #(2.5%?) of your Honour when you venerate a Maraketh Shrine | 280-420 |
| Minor Boon |  |
Fright Mask | Monsters deal 20% less damage | 220-320 |
| Minor Boon |  |
Glowing Orb | The next time you go below 20% of Maximum Life, restore all Life, Energy Shield and 50% of Honour | 160-420 |
| Minor Boon |  |
Hare Foot | 40% increased Movement Speed | 320 |
| Minor Boon |  |
Honoured Challenger | 50% increased Honour restored | 220-420 |
| Minor Boon |  |
Lustrous Lacquer | You have 50% more Defences | 220-360 |
| Minor Boon |  |
Lustrous Pearl | Traps are slower | 280-360 |
| Minor Boon |  |
Mirror of Fortune | The next Key you pick up is duplicated | 360 |
| Minor Boon |  |
Moment's Peace | You cannot be Damaged until you complete the next room | 220-320 |
| Minor Boon |  |
Orbala Statuette | You have 25% more Maximum Life | 280-360 |
| Minor Boon |  |
Ornate Dagger | You and your minions deal 50% more Damage | 220-360 |
| Minor Boon |  |
Sanguine Vial | Monsters have 30% less Maximum Life | 220-420 |
| Minor Boon |  |
Silver Chalice | The next Minor Boon you gain is converted into a random Major Boon | |
| Minor Boon |  |
Silver Tongue | 50% reduced Merchant prices | 280-320 |
| Minor Boon |  |
Scrying Crystal | You can see an additional room ahead on the Trial Map | 280-420 |
| Minor Boon |  |
Upward Path | Your Sacred Water found is increased by 10% on room completion (removed when you purchase something from the Merchant) | 280 |
| Minor Boon |  |
Viscous Ichor | Monsters have 15% reduced Action Speed | 220-360 |
Afflictions
Afflictions grant various downsides to your Trial run such as preventing or reducing Honour recovery, increasing the damage or speed of traps, buff monsters, reduce or disable your acquisition of Sacred Water, hide rooms or rewards on the Trial Map, and more:
| Affliction Type | Icon | Affliction Name | Description |
|---|---|---|---|
| Major Affliction |  |
Corrosive Concoction | You have no defences |
| Major Affliction |  |
Deadly Snare | Traps deal Triple Damage |
| Major Affliction |  |
Death Toll | Take # Physical Damage after completing 8 rooms (Note: this affliction is removed after it activates) |
| Major Affliction |  |
Ghastly Scythe | Losing Honour ends the Trial (removed after 3 rooms) |
| Major Affliction |  |
Glass Shard | The next Boon you gain is converted into a random Minor Affliction |
| Major Affliction |  |
Orb of Negation | Non-Unique Relics have no Effect |
| Major Affliction |  |
Unassuming Brick | You cannot gain any more Boons |
| Major Affliction |  |
Unquenched Thirst | You cannot gain Sacred Water |
| Major Affliction |  |
Veiled Sight | Rooms are unknown on the Trial Map |
| Minor Affliction |  |
Black Smoke | You can see one fewer room ahead on the Trial Map |
| Minor Affliction |  |
Blunt Sword | You and your Minions deal 40% less Damage |
| Minor Affliction |  |
Branded Balbalakh | Cannot restore Honour |
| Minor Affliction |  |
Chains of Binding | Monsters inflict Binding Chains on hit |
| Minor Affliction |  |
Chiselled Stone | Monsters Petrify on Hit |
| Minor Affliction |  |
Costly Aid | Gain a random Minor Affliction when you venerate a Maraketh Shrine |
| Minor Affliction |  |
Dark Pit | Traps deal 100% increased Damage |
| Minor Affliction |  |
Deceptive Mirror | You are not always taken to the room you select |
| Minor Affliction |  |
Dishonoured Tattoo | 100% increased Damage Taken while on Low Life |
| Minor Affliction |  |
Fiendish Wings | Monsters' Action Speed cannot be slowed below base
Monsters have 25% increased Attack, Cast, and Movement speed |
| Minor Affliction |  |
Forgotten Traditions | 50% reduced Effect of your Non-Unique Relics |
| Minor Affliction |  |
Golden Smoke | Rewards are unknown on the Trial Map |
| Minor Affliction |  |
Haemorrhage | You cannot restore Honour (removed after killing the next Boss) |
| Minor Affliction |  |
Honed Claws | Monsters deal 30% more Damage |
| Minor Affliction |  |
Hungry Fangs | Monsters remove 3% of your Life, Mana, and Energy Shield on Hit |
| Minor Affliction |  |
Iron Manacles | You have no Evasion |
| Minor Affliction |  |
Leaking Waterskin | Lose 20 Sacred Water when you take Damage from an Enemy Hit |
| Minor Affliction |  |
Low Rivers | 50% less Sacred Water found |
| Minor Affliction |  |
Purple Smoke | Afflictions are unknown on the Trial Map |
| Minor Affliction |  |
Rapid Quicksand | Traps are faster |
| Minor Affliction |  |
Red Smoke | Room types are unknown on the Trial Map |
| Minor Affliction |  |
Sharpened Arrowhead | You have no Armour |
| Minor Affliction |  |
Shattered Shield | You have no Energy Shield |
| Minor Affliction |  |
Spiked Exit | Take 25 Physical Damage upon Room Completion |
| Minor Affliction |  |
Spiked Shell | Monsters have 50% increased Maximum Life |
| Minor Affliction |  |
Suspected Sympathiser | 50% reduced Honour restored |
| Minor Affliction |  |
Tattered Blindfold | 90% reduced Light Radius Minimap is hidden |
| Minor Affliction |  |
Trade Tariff | 50% increased Merchant prices |
| Minor Affliction |  |
Tradition's Demand | The Merchant only offers one choice |
| Minor Affliction |  |
Untouchable | You are Cursed with Enfeeble |
| Minor Affliction |  |
Weakened Flesh | 25% less Maximum Honour |
| Minor Affliction |  |
Winter Drought | Lose all Sacred Water on floor completion |
| Minor Affliction |  |
Worn Sandals | 30% less Movement Speed if you've been Hit by an Enemy Recently |
Pledges
Players may sometimes be able to take on a Pledge to Kochai the Inscrutable at a Shrine, allowing the player to pick one of three random Pledges which provide significant upsides and downsides:
| Icon | Upside | Downside |
|---|---|---|
 |
Gain a specific Minor Boon | Lose 25% Maximum Honour |
 |
Gain a random Major Boon | Lose 50% Maximum Honour |
 |
Gain 2 random Minor Boons | Lose 50% Maximum Honour |
 |
Gain a specific Minor Boon | Gain a specific Minor Affliction |
 |
Lose a specific Minor Boon | Lose a specific Minor Affliction |
 |
Gain a specific Minor Boon | Gain a random Minor Affliction |
 |
Lose a specific Minor Affliction | Gain a random Minor Affliction |
 |
Gain a random Minor Boon | Gain a random Minor Affliction |
 |
Lose a random Minor Affliction | Lose a random Minor Boon |
 |
Gain 3 random Minor Boons | Gain a specific Major Affliction |
 |
Lose 3 random Minor Afflictions | Gain a random Major Affliction |
 |
Gain a random Major Boon | Lose 3 random Minor Boons |
Traps
- Spike Trap: Several large spikes will shoot out of the ground periodically, indicated by rumbling and dust.
- Flamethrower Trap: A four-way flamethrower spins around in a circle. Some ruined walls may provide paths to avoid them. Inflicts a fire damage over time effect on health and honour.
- Poison gas pressure plate: A pressure plate that releases poison gas when the player steps on it. Deals high chaos damage if stood on.
- Poison gas pressure plate that activates a colored lock: Similar to the above, except these will be connected to a colored lock and release gas after a short delay.
- Poison dart pressure plate: A pressure plate that causes poison darts to be fired.
- Fixed fireball turret: Slow-moving fireballs are shot out of the wall in a sequential pattern, with a short reload.
- Rotating fireball turret: Slow-moving fireballs are shot out sequentially while the turret rotates, with a short reload.
- Fire mine: Indicated by an orange circle on the ground. When stepped on it activates after a very quick delay, dealing high fire damage.
- Quicksand: Standing on it builds the quicksand debuff, slowing the player's action and movement speed. Deals no damage.
- Time mine: Standing on it inflicts the temporal rift debuff, teleporting the player back to the mine's location, then exploding after a short delay. Sometimes next to other traps.
- Fixed portal turret: Fires slow moving projectiles through portal in a straight line. Inflicts shock.
Note: Most traps can be dodge-rolled through, with immunity for the entire animation.
Boss Reward Room
The boss reward room can be accessed after defeating any of the floor bosses. Other than containing a stash, the Ascension Shrine, and the Keth Shrine to convert leftover Sacred Water to keys, this room contains Balbala as a Merchant and a trove of caches.
The quality of caches spawned can vary between regular, superior, and prime, seemingly increasing the rarity of items within. Small and medium caches also refer to the quantity of items contained. Type of caches include:
- Gear Caches: Helmets, Body Armour, Gloves, Boots, Shields, Jewellery, Amulet, Rings, and Belts.
- Relic Caches: Small and Medium Relics
- Reward Type Caches:
- Archetype Caches:
- Warrior's: Melee weapons
- Mage's: Caster weapons and Foci
- Ranger's: Bows and Crossbows
- Jewel Caches:
- Royal: Sapphires, Emeralds, and Rubies
- Time-lost: Contains time-lost jewels
- Gold Spectrum Cache: Contains a random Grand Spectrum unique jewel
Party play interactions
Party play within the trials are governed by the following set of rules:
- The Trial of the Sekhema's choices are made by the area's instance owner.
- All party members share Honour.
- If a party member joins midway through the trial, their relics apply to calculate their maximum honour, and then the flat amount of honour damage lost by the instance owner is applied to them. This can lead to instant death for the joining party member if, for example, the instance owner has 6000/7000 honour, and the newly joining party member has 1000 max honour.
Version history
| Version | Changes |
|---|---|
| 0.3.0 |
|
| 0.2.1 |
|
| 0.2.0g |
|
| 0.2.0 |
|
| 0.1.1e |
|
| 0.1.1 |
|
| 0.1.0e |
|
| 0.1.0 |
|
References
| Mechanics | |||||||
|---|---|---|---|---|---|---|---|
| Coins |
| ||||||
| Bosses | |||||||
| Relics |
| ||||||
| Unique item |
| ||||||