Act 1: Difference between revisions
Jump to navigation
Jump to search
No edit summary |
Mefisto1029 (talk | contribs) (First entered area will have alvl 8 second one will have 9) |
||
| (47 intermediate revisions by 8 users not shown) | |||
| Line 1: | Line 1: | ||
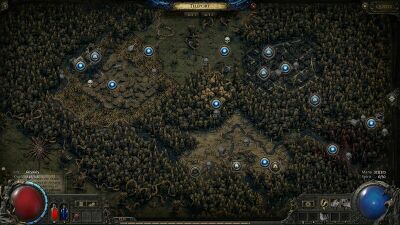
[[File:Waypoint map act 1.jpg|thumb|400px| | [[File:Waypoint map act 1.jpg|thumb|400px|Example overworld map of Act 1]] | ||
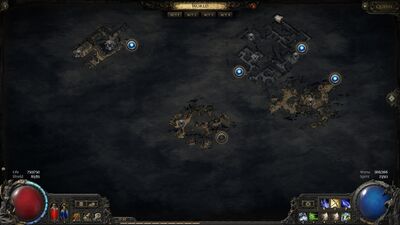
'''Act One''' is [[Path of Exile 2]]'s first storyline [[act]], taking place in the | [[File:Waypoint map act 1 underground.jpg|thumb|400px|Example underground map of Act 1]] | ||
'''Act One''' is [[Path of Exile 2]]'s first storyline [[act]], taking place in the region of [[Ogham]]. In this act, the exile washes up on [[The Riverbank|the riverbank]] after escaping a death sentence, and find their way to the [[Clearfell Encampment]]. They go on to travel through the Graveyard of the Eternals and Ogham Village to find and defeat [[Count Geonor]], before following [[the Countess]] and [[the Beast]]'s trail to the deserts of [[Act 2]]. | |||
==Quests== | ==Quests== | ||
| Line 17: | Line 9: | ||
{| style="text-align: center;" border="0" cellpadding="5" | {| style="text-align: center;" border="0" cellpadding="5" | ||
|- | |- | ||
| || || style="border: 1px solid grey;" | [[The Riverbank]]<br>1<br>Boss: [[Bloated Miller]] | | || || style="border: 1px solid grey;" | [[The Riverbank]]<br>1 [[File:No waypoint area icon.png|30px|link=|No Waypoint]]<br>Boss: [[The Bloated Miller]] | ||
|- | |- | ||
| || ||↕|| | | || ||↕|| | ||
|- | |- | ||
| || || style="border: 3px solid grey;" |[[Clearfell Encampment]]<br>[[File:Town_area_icon.png| | | || || style="border: 3px solid grey;" |[[Clearfell Encampment]]<br>[[File:Town_area_icon.png|30px|link=|Town Hub]]|| | ||
|- | |- | ||
| || ||↕|| | | || ||↕|| | ||
|- | |- | ||
| || || style="border: 1px solid grey;" |[[Clearfell]]<br>2 [[File:Waypoint area icon.png| | | || || style="border: 1px solid grey;" |[[Clearfell]]<br>2 [[File:Waypoint area icon.png|30px|link=|Waypoint]]<br>Boss: [[Beira of the Rotten Pack]]||↔|| style="border: 1px solid grey;" |[[Mud Burrow]]<br>3 [[File:underground no waypoint area icon.png|30px|link=|No Waypoint]]<br>Boss: [[The Devourer]] | ||
|- | |- | ||
| || ||↕|| | | || ||↕|| | ||
|- | |- | ||
| || || style="border: 1px solid grey;" |[[The | | || || style="border: 1px solid grey;" |[[The Grelwood]]<br>4 [[File:Waypoint area icon.png|30px|link=|Waypoint]]<br>Boss: [[The Brambleghast]]||↔|| style="border: 1px solid grey;" |[[The Red Vale]]<br>5 [[File:Waypoint area icon.png|30px|link=|Waypoint]]<br>Boss: [[The Rust King]] | ||
|- | |- | ||
| || ||↕|| | | || ||↕|| | ||
|- | |- | ||
| || || style="border: 1px solid grey;" |[[The Grim Tangle]]<br> | | || || style="border: 1px solid grey;" |[[The Grim Tangle]]<br>6 [[File:Underground waypoint area icon.png|30px|link=|Waypoint]]<br>Boss: [[The Rotten Druid]] | ||
|- | |- | ||
| || ||↕|| | | || ||↕|| | ||
|- | |- | ||
| || || style="border: 1px solid grey;" |[[ | | style="border: 1px solid grey;" |[[Tomb of the Consort]]<br>8/9{{efn|name=Level 8-9}} [[File:Underground waypoint area icon.png|30px|link=|Waypoint]]<br>Boss: [[Asinia, the Praetor's Consort]]|| ↔ || style="border: 1px solid grey;" |[[Cemetery of the Eternals]]<br>7 [[File:Waypoint area icon.png|30px|link=|Waypoint]]<br>Boss: [[Lachlann of Endless Lament]]||↔|| style="border: 1px solid grey;" |[[Mausoleum of the Praetor]]<br>8/9{{efn|name=Level 8-9}} [[File:Underground waypoint area icon.png|30px|link=|Waypoint]]<br>Boss: [[Draven, the Eternal Praetor]]|| | ||
|- | |- | ||
| || ||↕|| | | || ||↕|| | ||
|- | |- | ||
| style="border: 1px solid grey;" |[[ | | || || style="border: 1px solid grey;" |[[Hunting Grounds]]<br>10 [[File:Waypoint area icon.png|30px|link=|Waypoint]]<br>Boss: [[The Crowbell]]|| ↔ || style="border: 1px solid grey;" |[[Freythorn]]<br>11 [[File:Waypoint area icon.png|30px|link=|Waypoint]]<br>Boss: [[The King in the Mists (Freythorn)|The King in the Mists]]|| | ||
|- | |- | ||
| || ||↕|| | | || ||↕|| | ||
|- | |- | ||
| || || style="border: 1px solid grey;" |[[ | | || || style="border: 1px solid grey;" |[[Ogham Farmlands]]<br>12 [[File:Waypoint area icon.png|30px|link=|Waypoint]]|| | ||
|- | |- | ||
| || ||↕|| | | || ||↕|| | ||
|- | |- | ||
| || || style="border: 1px solid grey;" |[[ | | || || style="border: 1px solid grey;" |[[Ogham Village]]<br>13 [[File:Waypoint area icon.png|30px|link=|Waypoint]]<br>Boss: [[The Executioner]] | ||
|- | |||
| || ||↓|| | |||
|- | |||
| || || style="border: 1px solid grey;" |[[The Manor Ramparts]]<br>14 [[File:Waypoint area icon.png|30px|link=|Waypoint]] | |||
|- | |- | ||
| || ||↕|| | | || ||↕|| | ||
|- | |- | ||
| || || style="border: 1px solid grey;" |[[ | | || || style="border: 1px solid grey;" |[[Ogham Manor]]<br>15 [[File:Underground waypoint area icon.png|30px|link=|Waypoint]]<br>Boss: [[Candlemass, the Living Rite]]<br>Act Boss: [[Count Geonor]] | ||
|} | |} | ||
==Version history== | ==Version history== | ||
{{Version history table header}} | {{Version history table header}} | ||
{{Version history table row|0.1.0| | |||
* Introduced to the game. | |||
}} | |||
{{Version history table end}} | {{Version history table end}} | ||
==Notes== | |||
{{Notelist|notes= | |||
{{efn|name=Level 8-9|Entering the 'Tomb of the Consort' first will cause the 'Mausoleum of the Praetor' to be area level 9, and vice versa. Creating a new instance will cause the first area entered to regenerate with an area level of 9 instead of 8.}} | |||
}} | |||
{{Navbox World}} | {{Navbox World}} | ||
[[Category:Act 1| ]] | [[Category:Act 1| ]] | ||
Latest revision as of 21:23, 6 January 2026


Act One is Path of Exile 2's first storyline act, taking place in the region of Ogham. In this act, the exile washes up on the riverbank after escaping a death sentence, and find their way to the Clearfell Encampment. They go on to travel through the Graveyard of the Eternals and Ogham Village to find and defeat Count Geonor, before following the Countess and the Beast's trail to the deserts of Act 2.
Quests
 Reaching Clearfell
 Treacherous Ground
 The Hunt Begins (optional)
 Cracks in the Earth (optional)
 Secrets in the Dark
 The Mysterious Shade
 Sorrow Among Stones
 The Trail of Corruption
 Ominous Altars (optional)
 The Lost Lute (optional)
 Finding the Forge (optional)
 The Mad Wolf of Ogham
Progression
| The Riverbank 1 Boss: The Bloated Miller | |||||
| ↕ | |||||
| Clearfell Encampment |
|||||
| ↕ | |||||
| Clearfell 2 Boss: Beira of the Rotten Pack |
↔ | Mud Burrow 3 Boss: The Devourer | |||
| ↕ | |||||
| The Grelwood 4 Boss: The Brambleghast |
↔ | The Red Vale 5 Boss: The Rust King | |||
| ↕ | |||||
| The Grim Tangle 6 Boss: The Rotten Druid | |||||
| ↕ | |||||
| Tomb of the Consort 8/9[a] Boss: Asinia, the Praetor's Consort |
↔ | Cemetery of the Eternals 7 Boss: Lachlann of Endless Lament |
↔ | Mausoleum of the Praetor 8/9[a] Boss: Draven, the Eternal Praetor |
|
| ↕ | |||||
| Hunting Grounds 10 Boss: The Crowbell |
↔ | Freythorn 11 Boss: The King in the Mists |
|||
| ↕ | |||||
| Ogham Farmlands 12 |
|||||
| ↕ | |||||
| Ogham Village 13 Boss: The Executioner | |||||
| ↓ | |||||
| The Manor Ramparts 14 | |||||
| ↕ | |||||
| Ogham Manor 15 Boss: Candlemass, the Living Rite Act Boss: Count Geonor |
Version history
| Version | Changes |
|---|---|
| 0.1.0 |
|